Hands-on Practice Activities

A hands-on activity is an instructional technique that allows participants to learn by doing. During a hands-on activity participants are directly involved in their learning. Participants get direct practical experience as they apply their learning and learn from their failures. Hands-on learning is appropriate for both physical and mental skills and tasks.

Hands-on learning provides many benefits. Studies have shown that participants, who are given the chance to practice what they have learned, retain 75% of the information presented. The transfer of learning to the workplace is high with hands-on activities because the materials and equipment are the same as what they will be using on the job. Because the learning is relevant and immediate, participants in a hands-on learning environment are highly engaged and motivated. Hands-on learning also supports critical thinking and problem-solving skills as participants are expected to be more self-reliant as they work through the activity.

There are also disadvantages to hands-on learning activities. While the activity demonstration will focus on key skills, you still need to troubleshoot issues and answer a wide range of participant questions. Often, you will find that more than one instructor is needed. The primary instructor presents the demonstration and the other(s) circulate around checking in on participants’ progress and answering questions. Also, hands-on training is sometimes rushed. Participants may find they do not get enough practice opportunities to memorize the steps. If you create a high-quality job aid to guide participants during the training, you can help them recall the correct sequence or procedure when they are back on the job.

For more ideas on how to use job aids to support participant learning, refer to Job Aids.


Instructions

How to conduct an effective hands-on activity:

  1. (Optional) Distribute and describe how to use the job aid designed for the task, technique, or procedure.
  2. Demonstrate how to perform the task, technique, or procedure. Explain what you are doing and pause to demonstrate the steps. Refer to the job aid when appropriate.
  3. Ask participants to turn and describe the process to their partner. This helps participants internalize what they have learned. It also serves as a knowledge check as they can verify their memories of details with their partner.
  4. Ask participants questions about the key points of the demonstration. Answer participant questions.
  5. Monitor and provide guidance as participants practice performing the task, technique, or procedure.
  6. Provide both positive and corrective feedback so participants understand when they did something right and when they made mistakes.
  7. Allow participants to practice until they can perform the action without any errors.

Example

In the NHI “Bridge Inspector Refresher Training” course, participants practice selecting the appropriate codes for structure inventory and appraisal and structure type for the National Bridge Inventory (NBI). For his NHI “Instructor Development Course” training presentation, “Superstructure Type Identification,” Patrick Kane created a job aid for a hands-on activity using a page from the participant workbook. Figure 31 displays the practice coding worksheet Kane created for his training presentation. Figure 32 displays the job aid for used in the NBI coding activity.

Worksheet from Refresher Bridge Inspector Training Course. Title: Coding exercise. Name: (blank) Image of a bridge across a river. Image of the girders from the underside of same bridge. Item 43 with 3 boxes to enter digits for codes. Item 44  with 3 boxes to enter digits for codes. I

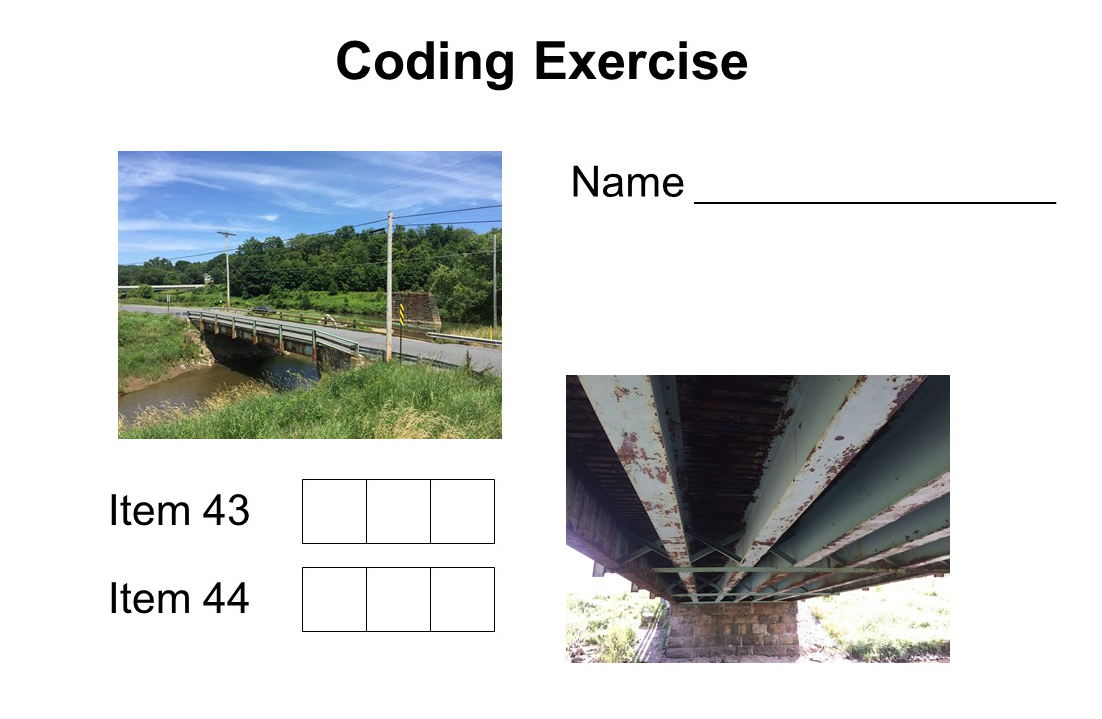
Source: Kane (2018).
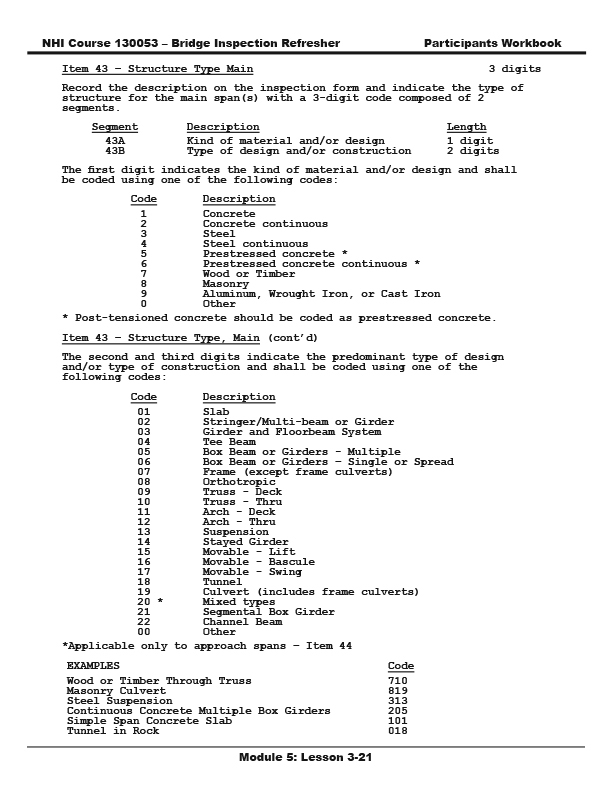
Figure 31:Practice coding worksheet from “Superstructure Type Identification”
Page header: NHI Course 130053 – Bridge Inspection Refresher, Participants Workbook.
                                        Subheading: Item 43 – Structure Type Main, 3 digits
                                        Record the description on the inspection form and indicate the type of structure for the main span(s) with a 3-digit code composed of 2 segments.
                                        2 row table
                                        Column headings: Segment, Description, Length
                                        Row 1: 43A, kind of material and/or design, 1 digit
                                        Row 2: 43B, type of design and/or construction, 2 digits
                                        
                                        The first digit indicates the kind of material and/or design and shall be coded using one of the following codes:
                                        10 row table
                                        Column headings: code, description
                                        Row 1: 1, concrete
                                        Row 2: 2, concrete continuous
                                        Row 3: 3, steel
                                        Row 4: 4, steel continuous
                                        Row 5: 5, prestressed concrete * (asterisk)
                                        Row 6: 6, prestressed concrete continuous * (asterisk)
                                        Row 7: 7, wood or timber
                                        Row 8: 8, masonry
                                        Row 9: 9, aluminum, wrought iron, or cast iron
                                        Row 10: 0, other
                                        Asterisk: post-tensioned concrete should be coded as prestressed concrete.
                                        
                                        Subheading: Item 43 – structure type, main (cont’d)
                                        The second and third digits indicate the predominant type of design and/or type of construction and shall be coded using one of the following codes:
                                        23 row table
                                        Column headings: code, description
                                        Row 1: 01, slab
                                        Row 2: 02, stringer/multi-beam or girder
                                        Row 3: 03, girder and floorbeam system
                                        Row 4: 04, tee beam
                                        Row 5: 05, box beam or girders - multiple
                                        Row 6: 06, box beam or girders – single or spread
                                        Row 7: 07, frame (except frame culverts)
                                        Row 8: 08, orthotropic
                                        Row 9: 09, truss - deck
                                        Row 10: 10, truss - thru
                                        Row 11 : 11, arch - deck
                                        Row 12: 12, arch - thru
                                        Row 13: 13, suspension
                                        Row 14: 14, stayed girder
                                        Row 15: 15, movable - lift
                                        Row 16: 16, movable - bascule
                                        Row 17:  17, movable - swing
                                        Row 18 : 18, tunnel
                                        Row 19: 19, culvert (includes frame culverts)
                                        Row 20 (asterisk): 20, mixed types
                                        Row 21 : 21, segmental box girder
                                        Row 22 : 22, channel beam
                                        Row 23: 00, other
                                        
                                        Asterisk: Applicable only to approach spans – Item 44
                                        
                                        Table
                                        Column headings: Examples:, code
                                        
                                        Row 1: Wood or timber through truss, 710
                                        Row 2: Masonry culvert, 819
                                        Row 3: steel suspension, 313
                                        Row 4: continuous concrete multiple box girders, 205
                                        Row 5: simple span concrete slab, 101
                                        Row 5: tunnel in rock, 018
                                        
                                        Page footer: Module 5: Lesson 3-21

Source: NHI (n.d.)

Figure 32: Job aid from “Superstructure Type Identification”

Instructor-Led Training

If the practice activity is complex, you can ask participants to work with a partner or in a table group to complete it. Facilitate the collaboration by providing only one set of documentation so that participants have to get out of their chairs in order to work together.


Web Conference Training

If participants will be working independently, provide a Worked Example or Job Aid to follow. Give participants a way to contact the instructor directly if they have any questions or difficulties while completing the activity.