Supporting Participants
The primary role as an instructor is to bridge the gap between what the participants currently know and what they are expected to do at the end of the training session. To do that, you will need to move them step-by-step toward a deeper understanding. At the end of the training, participants should be able to perform the skill, task, or behavior independently. It is helpful is for participants who are new to the topic or skill to receive a little extra help. This help is sometimes referred to as “scaffolding.” Like the framework used to support a building under construction, instructional scaffolding is meant to provide temporary assistance to learners as they grow more competent in their ability to perform independently. In the scaffolding process, the instructor systematically gives participants the chance to acquire the necessary skills incrementally. Participants can practice and receive feedback that reinforces their learning. As participants become more independent, the instructor gradually removes the “supports.” This process is sometimes referred to as “crawl, walk, run.” There are many instructional strategies and techniques you can use to scaffold participant learning.
However, there are some downsides to scaffolding. It takes time to plan and implement scaffolding activities. It can be difficult to find the appropriate scaffold to meet the needs of all participants in the class. And it is not always clear when participants are able to work independently and no longer need the scaffolding.
Some common scaffolding strategies include the following:
- Clearly make connections to knowledge and skills that participants learned in a previous lesson. Refer to Step 3: Plan Your Opening for ideas on creating links during a lesson introduction and Activating Participants’ Prior Knowledge for a list of effective activities.
- Break a lesson into mini-lessons that allow participants to master easier skills first before moving onto more complex skills. Check for comprehension between each mini-lesson.
- Present multiple opportunities for participants to engage with the material. For example, you can orally describe the concept, show a video clip, and ask participants to sketch a diagram or write a descriptions of how they would apply the concept on the job. Using these or similar methods helps participants to interact aurally, visually, and kinesthetically with the content.
- Provide participants with a high-quality example of what they are going to be asked to complete. Explain the features of the assignment and what makes the example exemplary. You can also model a process so participants can see how it is performed before they try it themselves.
- Clearly explain the purpose of an activity, provide step-by-step instructions, and supply the rubric, checklist, or other scoring tool that will be used to evaluate participants’ work. When participants understand the relevance of an assignment and how they will be assessed they will be more motivated to achieve the learning goal. Refer to Assessing Learning for more information on assessment tools.
Other instructional tools you can use to support participants’ learning are:
- Analogies
- Case Studies
- Concrete Examples
- Cooperative and Collaborative Learning
- Games
- Graphic Organizers
- Infographics
- Job Aids
- K-W-L Charts
- Models
- Role Playing
- Visual Aids
- Worked Examples
Example
As part of his NHI “Instructor Development Course” training presentation on “Global Girder Stability,” Douglas Whittaker created scaffolded worksheets (figure 6) to help participants understand how length impacts the stability of a girder. He provided the equation to calculate girder stability and the variables for two girders of different length. A second sheet provided the same equations with boxes to enter the data for the two girders. By providing the equation, participants could focus on calculating the impact of a change in length—which was the intended outcome for the lesson.
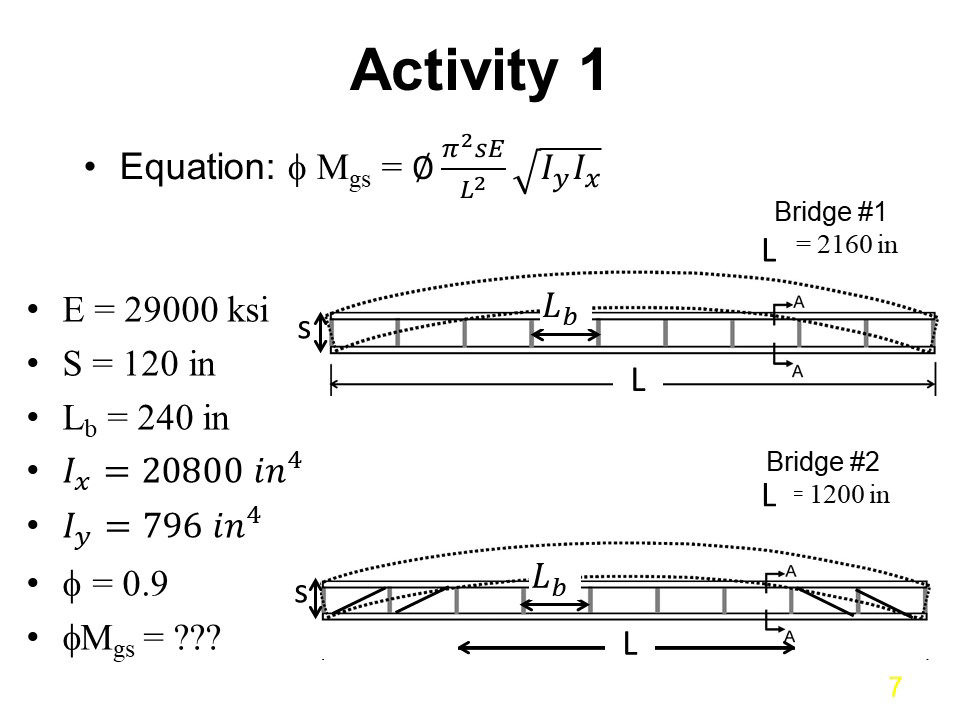
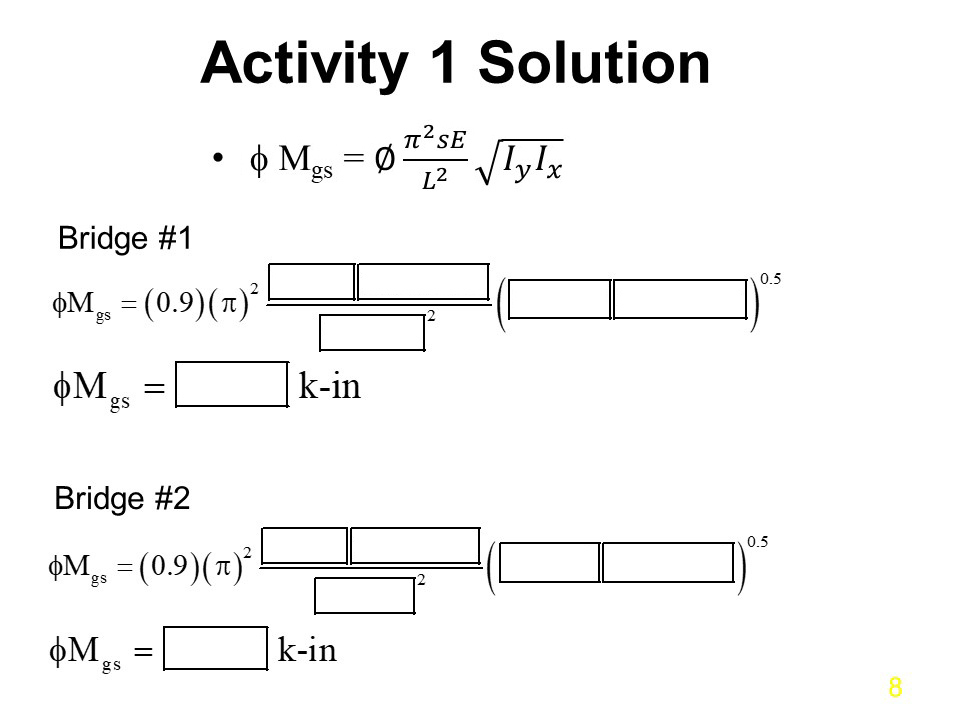
Source: Whittaker (2019)